
How to Use Magic Eraser in Canva – Remove Objects in Seconds
Learn how to use Canva’s Magic Eraser tool to instantly remove unwanted objects, people, or backgrounds from photos with just a few clicks.
This guide provides detailed instructions on how to use the Picture Eraser tool in Canva, a powerful feature for editing and customizing images.
Follow these steps to effectively remove unwanted parts of your images with ease.
Canva’s Magic Eraser allows you to quickly remove unwanted objects from photos using AI. Follow these steps to use it effectively:
1. Open Your Image
Log into your Canva account.
Open an existing design or create a new one.
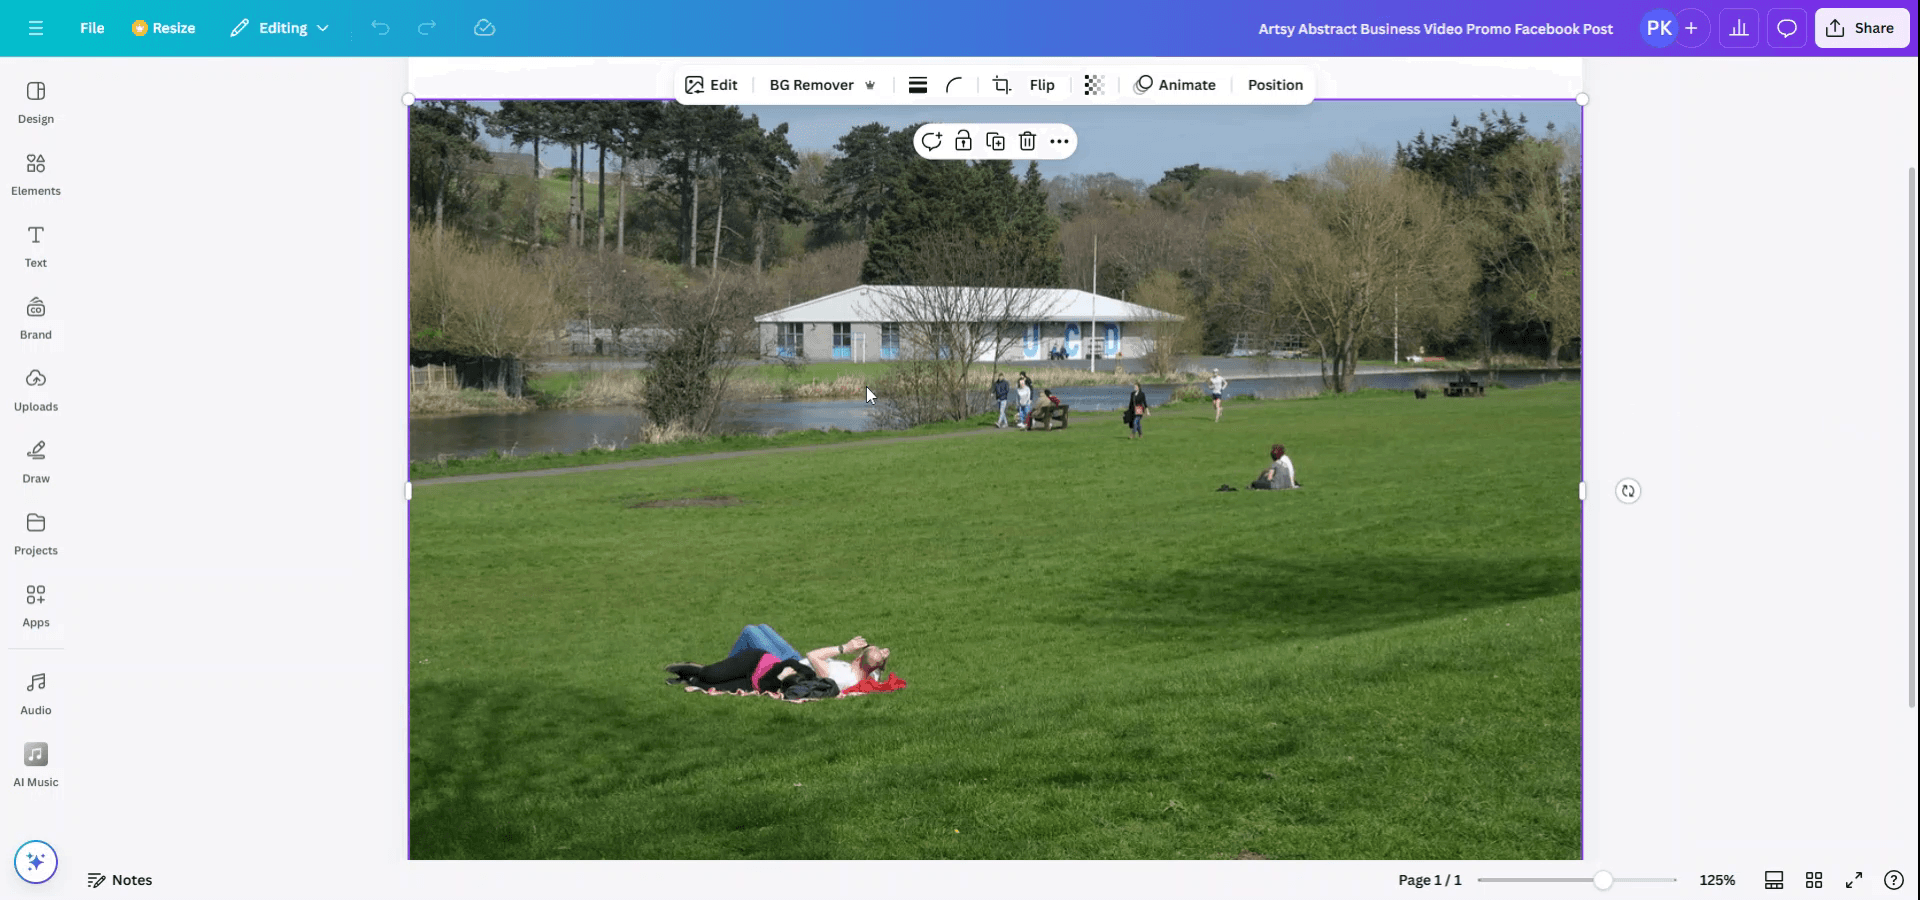
Upload the image you want to edit and click on it to select.
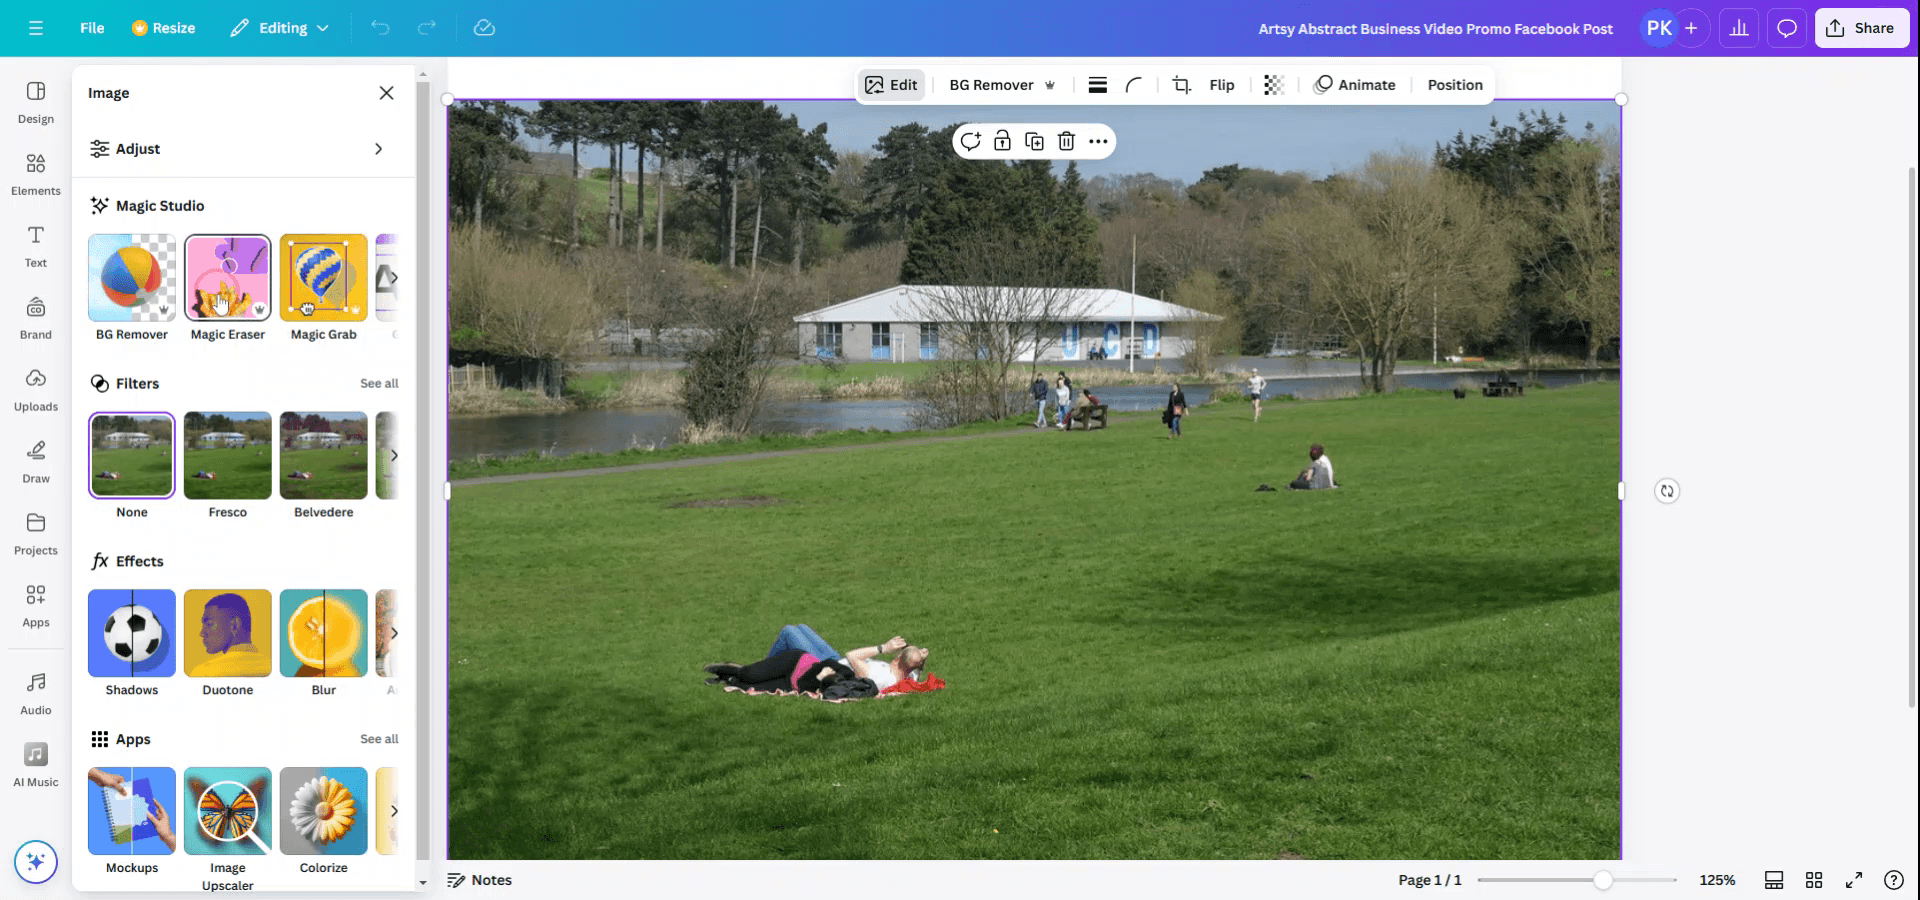
2. Access the Magic Eraser Tool
Click Edit Photo from the top toolbar.
Under the Effects tab, select Magic Eraser.
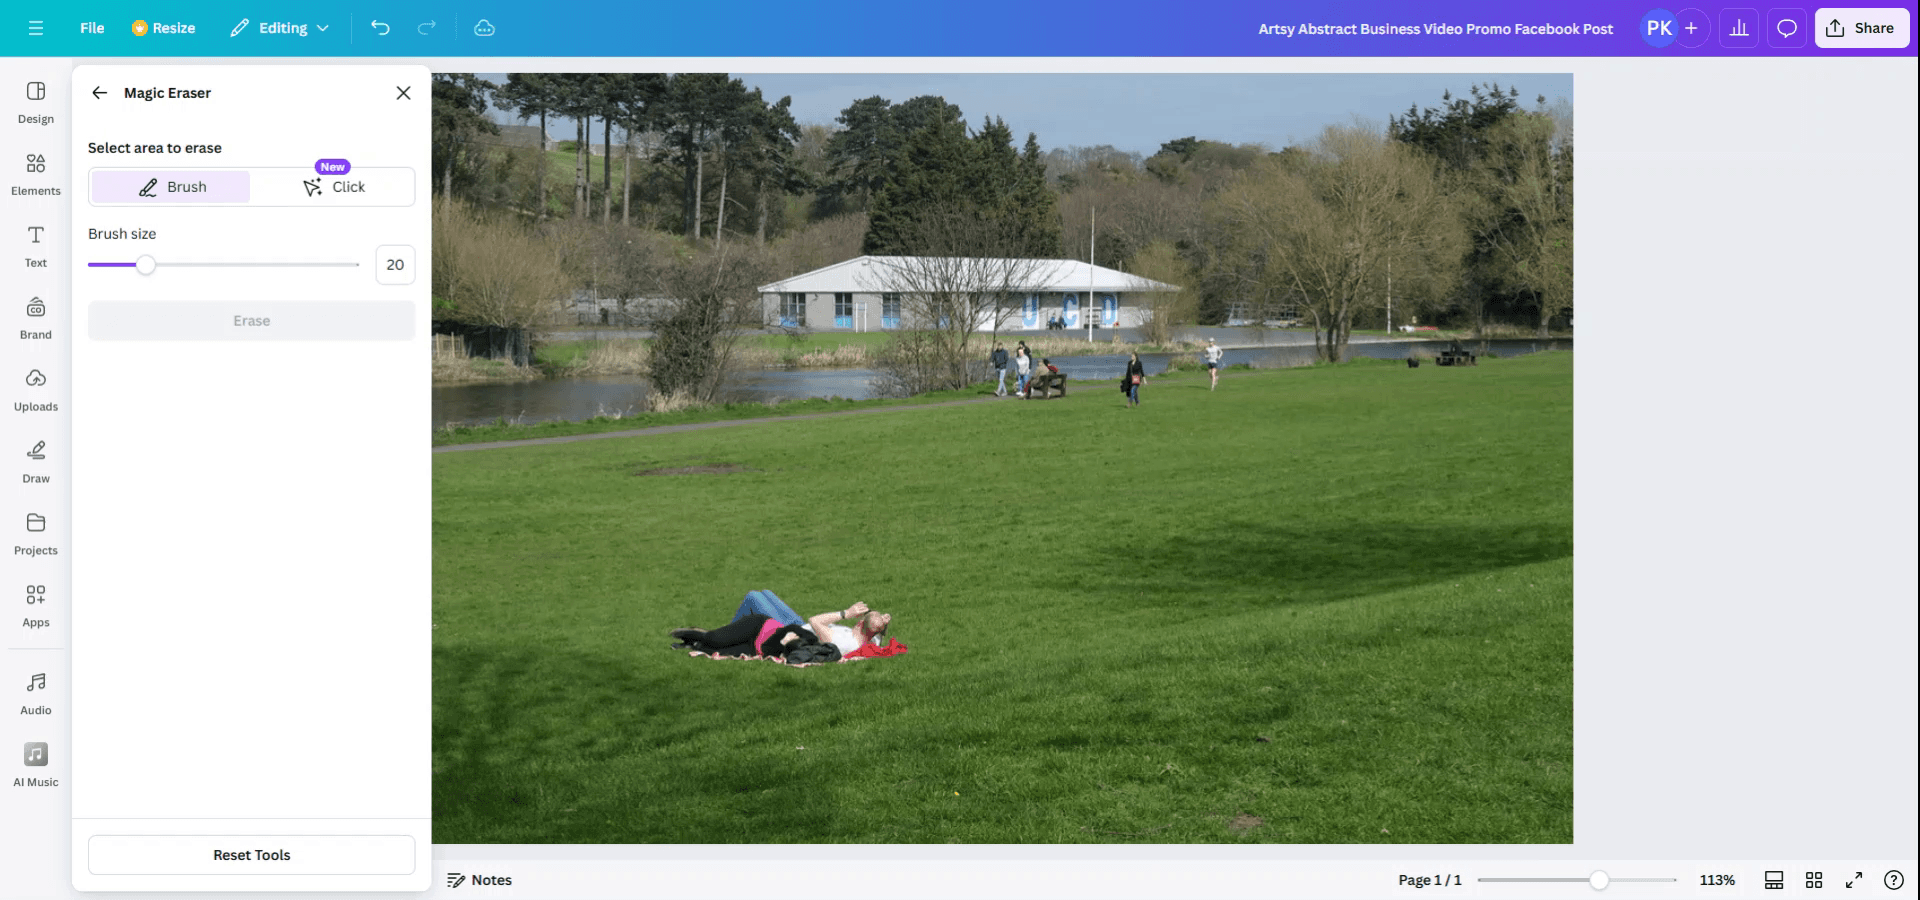
3. Brush Over the Object
Use the brush to paint over the object you want to erase.
You can adjust brush size with the slider to suit the object’s dimensions.
4. Click "Erase"
Once brushed, click Erase and Canva’s AI will remove the object from the photo.
5. Use Magic Edit (Optional)
After erasing, you can use Magic Edit to replace the erased space with something else.
Brush the area, describe what you want, and let Canva generate the new element.
6. Save Your Work
Once editing is complete, click Done, then Save to Canva to preserve your changes.
Step-by-Step Guide: How To Use Magic Eraser in Canva
Step 1
To begin using the Picture Eraser in Canva, select the image you wish to edit.
Step 2
Once the image is selected, a toolbar will appear. Click on the "Edit" option.

Step 3
Upon entering the editing mode, you will find various options for image modifications. Select the "Magic Eraser" tool from these options.
Step 4
Using the Magic Eraser tool, choose whether to select by brush or by click. In this instance, use the brush to highlight the portion of the image you want to remove, and then click on "Erase."

Step 5
And Voila! Your selection will be removed.
Pro tips for using magic eraser in Canva
Select the Image to Edit:
Click on the image you want to edit in your design.Click on "Edit Image":
After selecting the image, click on the "Edit image" option on the toolbar above your design.Choose the "Background Remover" Tool:
In the "Edit image" panel, scroll down and find the "Background Remover" tool. While this tool is primarily for removing backgrounds, it can also function similarly to an eraser to eliminate unwanted parts of an image.Use the Eraser Tool on the Image:
If you're trying to erase parts of the image selectively, use the "Erase" feature in the "Adjust" settings after removing the background. This allows you to erase specific areas from the image, effectively making them transparent.Adjust Eraser Size:
You can adjust the size of the eraser tool to be more precise by dragging the slider for size. This helps when working on detailed parts of the image.
Common pitfalls and how to avoid them using magic eraser in Canva
Erasing Unwanted Areas by Mistake:
Zoom in before erasing to have better control over what you are removing. You can undo any accidental erasures by pressingCtrl + Z(Windows) orCommand + Z(Mac).Image Quality Deteriorating After Erasing:
Avoid overusing the eraser on high-resolution images. If the image starts to lose clarity, consider using the tool in moderation or choose a different technique like cropping instead.Inaccurate Erasing:
Use a smaller eraser for precise areas, and adjust the transparency of the eraser tool to fine-tune the removal process. Also, use the "Restore" feature if you erase too much.No Clear Eraser Option:
If you don’t see the "Background Remover" or eraser tool, ensure you’re using a Canva Pro account, as some features are exclusive to Canva Pro users.Losing Part of the Design After Erasing:
Always make a duplicate of the image before using the eraser tool. This allows you to revert to the original if you need to.
Common FAQs for using magic eraser in Canva
Can I erase parts of an image in Canva?
Yes, you can erase parts of an image using the background remover and erase tool. However, this feature is available to Canva Pro users.How do I undo an erasure in Canva?
You can undo an erasure by pressingCtrl + Z(Windows) orCommand + Z(Mac).Is there a way to erase specific areas without affecting the whole image?
Yes, the eraser tool allows you to selectively remove parts of the image. You can adjust the size of the eraser for more precise control.Can I erase the background of an image using the eraser tool?
Yes, the background remover tool effectively removes the background, and the eraser tool can be used for finer adjustments or removing parts of the image.Can I use the eraser on a free Canva account?
The eraser and background remover tools are available to Canva Pro users. Free account users can only use limited image editing features.How to screen record on mac?
To screen record on a Mac, you can use Trupeer AI. It allows you to capture the entire screen and provides AI capabilities such as adding AI avatars, add voiceover, add zoom in and out in the video. With trupeer’s AI video translation feature, you can translate the video into 30+ languages.How to add an AI avatar to screen recording?
To add an AI avatar to a screen recording, you'll need to use an AI screen recording tool. Trupeer AI is an AI screen recording tool, which helps you create videos with multiple avatars, also helps you in creating your own avatar for the video.How to screen record on windows?
To screen record on Windows, you can use the built-in Game Bar (Windows + G) or advanced AI tool like Trupeer AI for more advanced features such as AI avatars, voiceover, translation etc.How to add voiceover to video?
To add voiceover to videos, download trupeer ai chrome extension. Once signed up, upload your video with voice, choose the desired voiceover from trupeer and export your edited video.How do I Zoom in on a screen recording?
To zoom in during a screen recording, use the zoom effects in Trupeer AI which allows you to zoom in and out at specific moments, enhancing the visual impact of your video content.
Suggested Reads
Technical Documentation Generator
How to Turn an Image into a Coloring Page in Canva
How to Create a Ruler in Canva
Related Tutorials

